

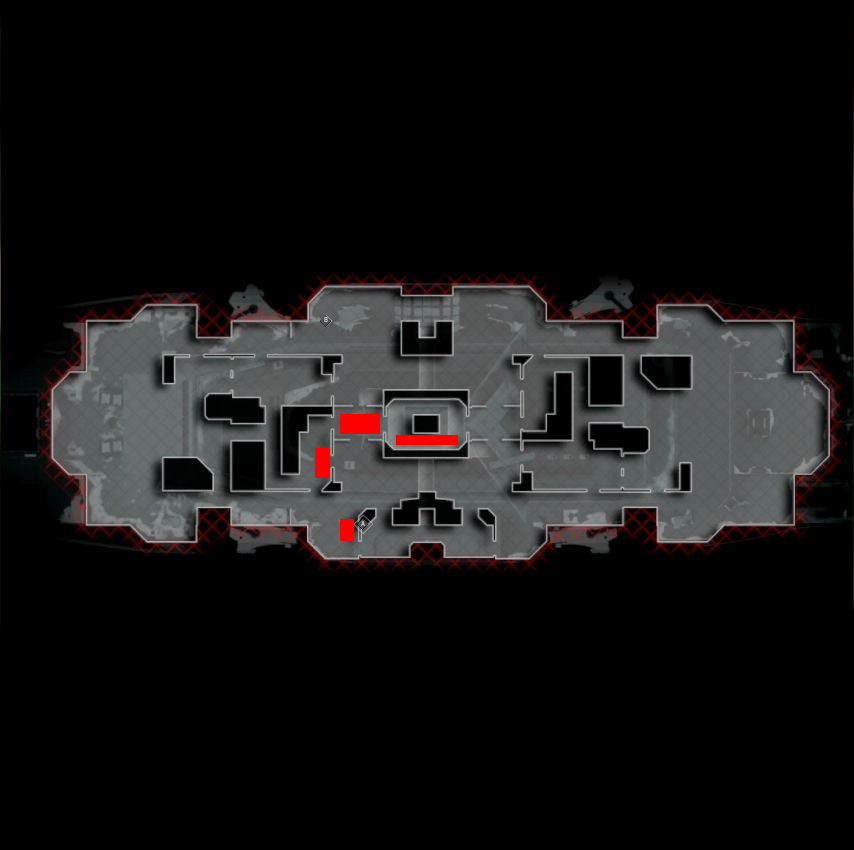
Map Layout

Glacier is fairly straight forward: The Attacking side spawns on the right side of the map, while the Defending team spawns on the left. The main layout of the map is asymmetrical, meaning that both sides pretty much have the same advantages when approaching their half of the repeat angle. The only thing that breaks this maps logic is the bomb sites, which are located on the north and south sides of the map, within the Defenders half of the map.
The map contains a few different styles of environment. There are zip lines towards the edges of the map that take you to other site push spots. Also, there are indoor and outdoor map locations, that blend to make a unique style of pacing. The most exciting part of the map is the bottom level of the ship. There are four ways to enter, with stairs leading to Diving Room from the north, east, south, and west. This means that team can avoid most of the map’s natural routes and arrive where they want by opting for the Diving Room.
As for the midlevel of Glacier, it essentially has three parts to it. The main part of mid brings you to a long corridor, with a block preventing one side seeing the other. By the time either team makes it to that room, chances are an enemy made it there too; which creates a close-range battle to the death for Mid control. There are also a few alternative routes, with players opting to jump out of windows to get onto sites instantly, or ledges so they can still play mid and yet half commit to defending or attacking a site. This makes for some rather exciting tactics, as players can appear at any moment to change the way a battle is going.
Map Strategy
Defense B Site

The B Site contains a mixture of outdoor and indoor defense requirements. The platform at the edge of the ship is good for hiding at, surprising enemies on either side on B rounds. Very close by is a one-way window, which players with Defender side mid control can use to their advantage by having the higher ground, or by jumping down and pushing when needed. Be careful of the flank as there is no cover protecting that player from a flank from Mid-to-A. As mentioned previously, the Diving Room is an important aspect by preventing any lurkers or players trying to push from below.
Therefore, the defense should have two players playing the site, with one player above and one player below to control the angles that attackers will approach from. Controlling the top floor and bottom floor is vital to deny any rotates to the other bomb site, allowing for the players on another site to switch defense location with ease. Furthermore, holding the top and bottom floor successfully means that the opposition needs to commit to their original game plan, or rotate back to their spawn, eating away time and losing the element of surprise on their next decision.
Defense A Site
Glacier’s defense seems to encourage a remarkably similar playstyle for A site. Once again, one player needs to defend the top and one other at the bottom. Controlling to rotations and enclosed space on both map levels is too crucial to a round’s success. The other two players should look to hold the site and play default site cover spots.
Attacking
As the Defenders will spread their resources across all three layers of Glacier, the attackers have a bit more freedom to make impressive plays. They can full-stack Diving or Mid and gain full control of that floor, giving themselves space to decide from there. Or they can challenge by doing the one-two-one setup that the map naturally encourages. Either way, rotating or controlling rotations is once again key to a healthy attack.
The Attackers need to be aware of the powerful natural spots that Defenders will look to use every round. Over on A site, there is a Mid to A Window that Defenders will want to station for its advantages. For B site, the one-way window is something they will need to contest. The same goes for Diving Room, as gaining control of that room allows players to do as they wish.
Attacking A Site

There are a few tricks to controlling A site. One way is to use the zipline to get closer to A’s planting zone and gunning the back end of site. Players can also walk naturally into the A to Mid as it is an inside location, there are bits of cover to dodge rounds hailing from the A to Mid window. Using either Grenades, Semtex, Ronin’s knife, etc is extremely strong for this, especially when upgrading a gadget’s explosion radius to cover even more of the window’s viewing angle.
Attacking B Site

Over on B, gaining control of the one-way window is a nice way to pop any defenders playing aggressively on site. There are also two ways to path onto the site if you are playing the main deck floor. One takes you to an indoor area with a drop to Diving while the other is more exposed to the one-way window and the indoor space for defenders. The player that paths that route will need to work with the player assaulting mid to make this route work. If not, this player can be punished quickly from the defender in mid, or even the defender that flanks through the Diving Room.
One more tip for this site is the post-plant. The site has a zip line to the defender spawn. Going from site to the defender side of zipline is a great lurking spot, especially if the plant spot is in sight of the zipline’s defender side. You can use this angle to pop out and down the diffuser, creating pressure away from the site.
Here is the one-way window overlook B. (Photo courtesy Hi-Rez Studios)
Suggested Rogues for Glacier
Chaac and Scorch are great duelists on this map for either team. The high stakes nature in Mid and Diving means you want duelists to head that way. Scorch is all about burst damage while carrying Molotovs to force people out of cover. Chaac is the natural lurker, with burst healing or a self-revive from his ability. Chaac is a great choice for tanking and making sure a crucial angle belongs to whatever team they are on.
Defender Rogues
Trench feels like a go-to rogue for any defender half. Trench ideally belongs in the Mid-to-A window, deploying his APS to prevent any incoming grenades from displacing him. Combine this with his assault rifle or DMR, Trench has the perfect weaponry to dominate that map location. Furthermore, on his way to A to Mid, he can drop his Barbed Wire on mid to help slow down any full-on mid assaults.
Dallas’ on-demand intel gathering is another big advantage for players. At the touch of a button, he can pick up the closet enemy, and inform his team of a potential game plan from the enemy. When he gets a kill, his ability refreshes. This means that Dallas can work out the enemy game and route on a map that is even more critical for success.
Attacker Rogues
One thing that is noticeable about the attacking side is the importance of gadgets and gizmos. Grenades are great on this map, with plenty of windows and covered areas to get control of.4
Chaac and/or Scorch
Dima / Sigrid
Ronin
Dahlia
Dima is one of the stronger rogues for this as his grenade count is unmatched. He has his cluster grenade, two emps if maxed out and a regular frag grenade. His utility count is going to work wonders for working out enemy locations. Alternatively, Sigrid’s Ballistic Shield can flush out mid, support allies taking Diving or assault sites herself.
Ronin is a valuable pick as her explosive throwing knife works well on maps with rotations, acting as a booby trap or for taking out window control. Her assault rifle is fantastic for attacking mid and sites too, with its strong range and damage per round.
Dahlia is arguably the better support with her smoke grenades and frag grenade. She can smoke windows if she wants and frag them if needed. Furthermore, her in combat ally tagging and reviving can work through different floors since the layers are relatively compressed.


