The Stacks are between the Muster, Fire Station, Bridge, and Canteen areas. This area is a hub for the players navigating across the map as it has access to both outside lanes.
The fifth hill in Hardpoint is located in the Muster area directly behind the Stacks, which means there will likely be gunfights in this area. There are two metal objects in this open area, but it is best to avoid using them for cover as they are exposed to the other entrances.
The Stacks are a connector to other essential parts of the map, but players should avoid being caught in this wide-open environment.
Fire Station

The Fire Station is between the Stacks and Control building. This one-room building does not hold much strategic value, but it does serve as a buffer in some game modes.
The C Flag in Domination is between the Fire Station and Control building, so players defending the flag can sit in Fire Station to stop players from pushing from the Stacks or Muster area. The building is also an excellent place to call in killstreaks or to take cover from enemy killstreaks.
Control

The Control building in Petrov Oil Rig is between the Fire Station and Drill area. The second floor of the building offers an elevated view on both sides and is an excellent spot to watch various objectives.
The second hill in Hardpoint is located in the Drill area directly in front of the Control building. Players can use the window on the second floor to cover players pushing from the Ventilation, Flare, and Overlook areas. The Overlook building has a direct line of sight of the second story of the Control building, however, so keep an eye out for enemy snipers.
There are two stairways to the second floor of the building, which means enemies can attack from either side. Two players both entryways and easily hold the building for their team.
Flare

On the eastern side of the Drill area is a small location called Flare. This covered location leads to the Drill, Overlook, and Control areas.
Players often use Flare to avoid crossing the Drill area or to pressure enemies holding the Hardpoint. Two large pillars protect players running through the area, and an aggressive player can quickly make it between the Overlook and Control buildings.
Drill

The space between the Overlook and Control buildings in Petrov Oil Rig is a broad area featuring a massive Drill in the middle. This is the location of the second hill in Hardpoint and a popular area for player activity.
The Ventilation connector that leads to the Bridge is on the western part of the Drill area, which players use to enter or leave the center of the map. Both buildings on either side have an elevated view of the Drill and can easily pick off players navigating this position.
There are several positions to clear when moving this location, so consider using other routes to avoid being an easy kill.
Overlook

The Overlook building in Petrov Oil Rig is south of the Drill and connects to the Pumps and Flare areas. This building is very similar to the Control building as there are two stairways leading to the second floor and a window to cover the Drill.
This building does have a large accessible first-floor room that connects to the Flare and Drill areas. Make sure to protect these lower entrances if you plan on using the second floor as a vantage point.
Pumps

The Pumps are behind the Overlook building and Bridge and cover a significant portion of the map. The Pumps area features a connector that runs from the Overlook building to the Cargo area. There is also a second path that leads directly from the Bridge to the Cargo containers.
This area is the main route Coalition players will use after spawning as it leads to two important parts of the map. Players will not usually fight over control of the Pumps, but it is a critical junction between the center and the eastern part of the map.
Cargo and Helipad – Coalition Spawn
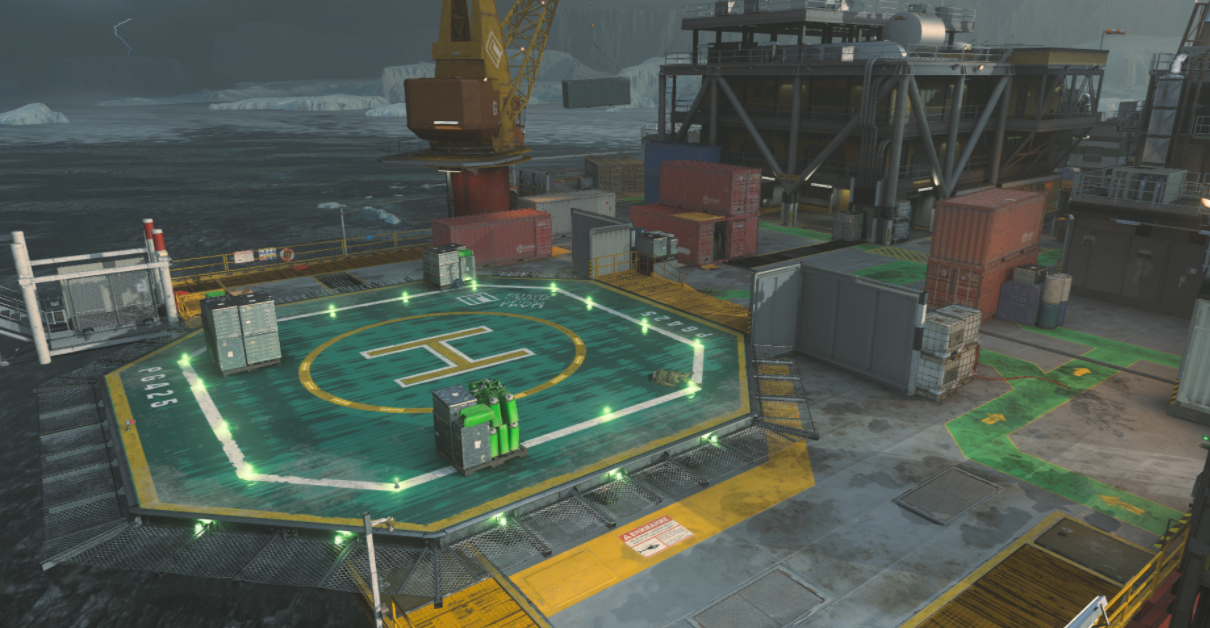
The southern part of Petrov Oil Rig features several Cargo containers and a Helipad. The fourth hill in Hardpoint spawns at this location, and it generally receives a lot of player traffic in most matches.
The Cargo area connects to the Quarters, Pumps, and Crane sections of the map. Several of the Cargo containers can be climbed and provide excellent areas to surprise enemies.
The Helipad is an open location that mainly sees action in Hardpoint. There are very few objects to use as over in this secluded area, so you’re better off sticking to the Cargo containers.
Quarters

The Quarters location consists of a series of Hallways that connect the Office and Bridge. A window facing the Bridge is the focal point of this area and is a solid position to cover the middle of the map.
Crane and Office

The Crane in Petrov Oil Rig mainly serves as a connector between the Fuel and Cargo areas but does have a few useful positions. Players can use a Cargo container in this area to cover the Fuel entrances and to cut off rotations into the center of the map.
The Office area leads to the Fuel section of the map and serves a minimal strategic purpose. It does connect to the Quarter’s hallway and Crane, however, so it can be used to flank Allegiance players.
Fuel

A large Fuel tank is at the western edge of the oil rig and is an outside lane of the map. The third hill in Hardpoint spawns at this location, and many players use the area to traverse the map.
The Fuel tank breaks the line of sight from both ends of the map, but players will be exposed when exiting the area. Sniper rifles are a solid choice for covering this outside lane but be prepared for multiple enemies pushing this position.
Lift

The lift is a small room with a ladder that allows players to reach the bottom and top parts of the Bridge. This area also connects to the Medical hallway and Fuel tank.
The Bridge is one of the most contested areas of the map, which means the Lift is an important access point to control. Long-range players can sit in the Quarters hallway to watch for enemies climbing the ladder, or close range players can sit up close and eliminate them before they reach the second story.
Bridge

The Bridge is the center point of the map and one of the most dangerous locations. Several objectives are located in this area in various game modes, and players are constantly crossing the bridge.
The Bridge connects the western and eastern parts of the map and is a critical junction to control. This is the quickest route to cross the map, and a team can significantly delay enemy players trying to reach other areas.
The window in Quarters is perfect for covering the Bridge, but a lot of players will check this spot by default. Players with long-ranged weapons can sit towards the Cargo areas to eliminate players on the bridge, as long as they hit their shots.
Running across the map beneath the bridge is not recommended, as it is a large open area. There are a few places to hide, but you will eventually have to run through the open and be vulnerable to enemy players.
Canteen

The Canteen in Petrov Oil Rig connects the western and northern parts of the map and is a quick way to reach the Fuel or Bridge.
The extended exterior hallway in this location can be deadly if players are holding either exit, but the interior Canteen building is perfect to avoid being out in the open. There is also a small platform that connects the Muster area directly to the Canteen hallway that allows players to bypass the Stacks.
The Canteen will rarely be the location of massive battles, but it is a useful route when moving between parts of the map.
Muster

Muster is the northern area of the oil rig. There are several lifeboats and platforms that provide cover for players, and a team with chemistry can hold the area with ease.
The final hill in Hardpoint is located in Muster and can be a difficult area to take. The large platforms provide ample cover for defending players who can watch the three main entrances to the location.
Attacking players can use killstreaks to their advantage as most of the area is not covered. The three entryways into Muster also allow teams to overwhelm defenders by attacking from multiple angles at once.
Petrov Oil Rig provides a classic Call of Duty experience with a variety of layouts throughout the map. Mig range weapons are ideal for most situations, but there plenty of opportunities for close or long-range players to dominate.